
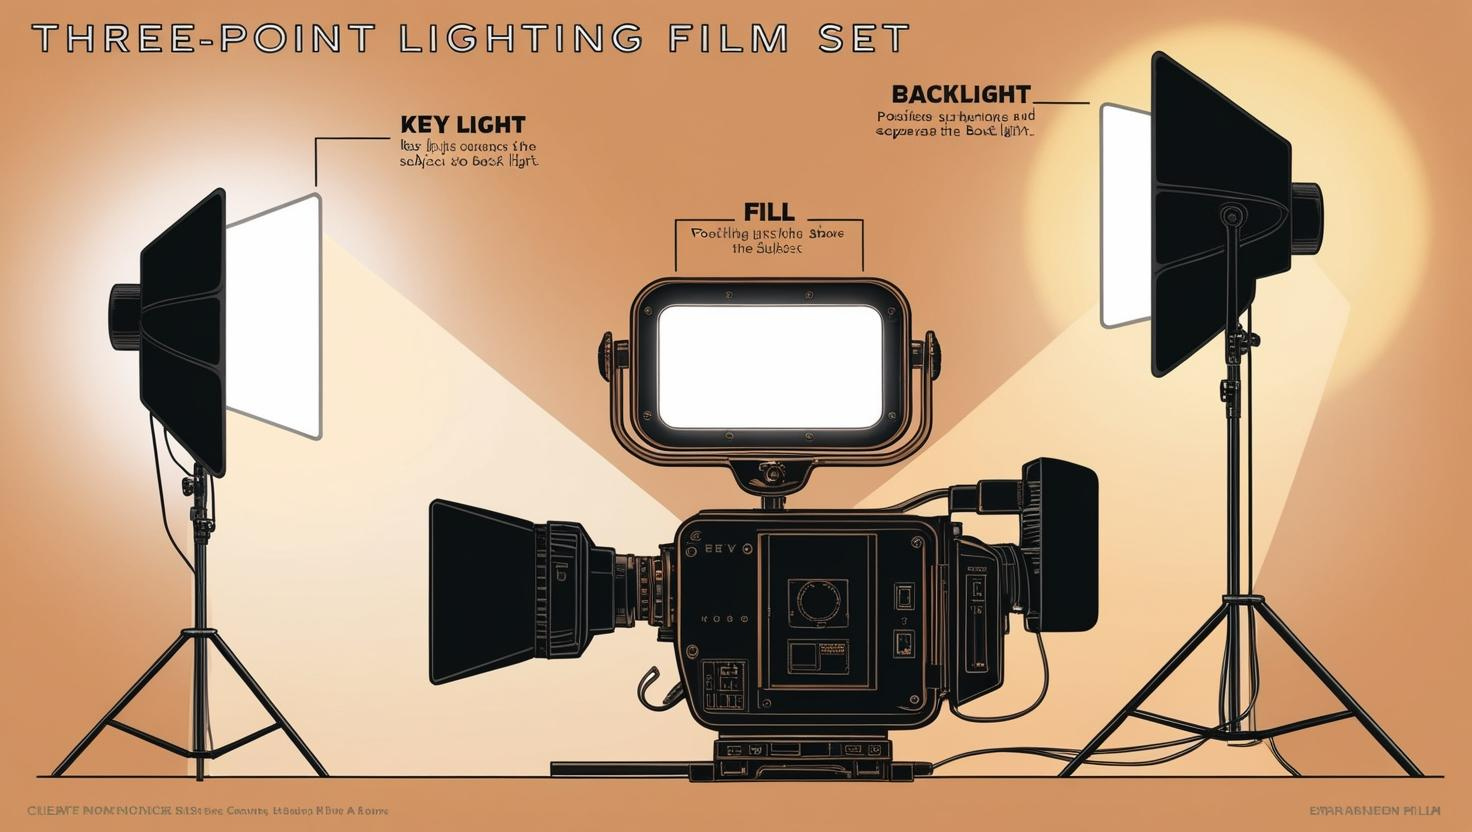
Three-point lighting isn't rocket science, but it's damn effective. Professional videographers swear by this setup: key light (main illumination), fill light (shadow reducer), and backlight (subject separator). Position the key light at 45 degrees, balance shadows with fill light at 50% intensity, and add dimension with backlight. It creates dynamic shadows, enhances credibility, and adds a professional polish without fancy training. Even amateurs can nail this technique and instantly enhance their footage. The transformation might shock you.
Why Three-Point Lighting Is the Industry's Best-Kept Secret
While amateurs struggle with flat, amateurish lighting, professionals quietly rely on a technique that's hiding in plain sight: three-point lighting.
It's the industry's not-so-secret weapon. Film schools teach it. Commercial sets use it. Every professional knows it. Period.
The beauty? Reproducible results that scream quality. Set it up once, then repeat on every project. Instant credibility.
Directors and cinematographers have been using this setup for decades since—shocker—it actually works.
It's like the little black dress of lighting. Classic. Reliable. Always in style.
Want to look professional without years of training? Three lights. That's it.
This timeless technique creates dynamic shadows that bring life and dimension to otherwise flat images.
The intensity of your light sources dramatically affects both the brightness and the edges of shadows in your scene.
The Key Light: Mastering Your Primary Light Source
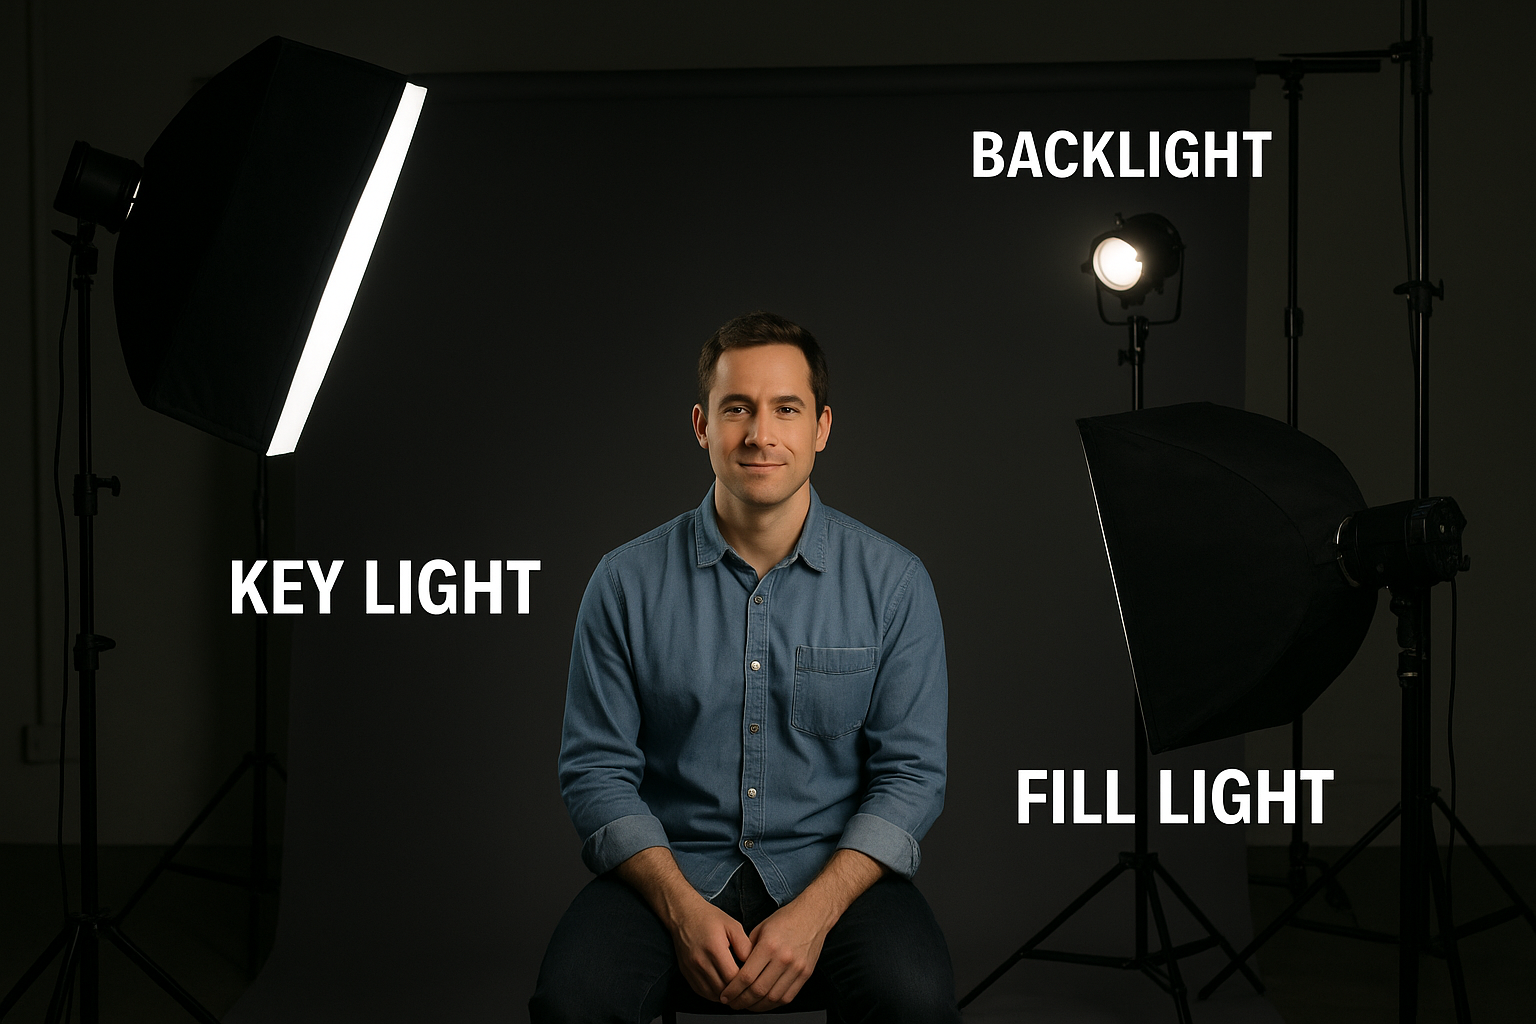
Every professional lighting setup revolves around a single critical element: the key light. It's not just important—it's essential. This primary light source defines your subject's shape and sets the entire mood of your shot.
Typically positioned 45 degrees from camera and slightly above eye level, the key light creates dimension through strategic shadows. You can't fake this. Moving it higher, lower, or to either side dramatically changes your visual story. For advanced cinematic looks, consider creating a J hook setup where light transitions from hard to soft for added depth and dimension.
The key-to-fill ratio matters. Standard is 2:1, but go higher for drama, lower for flat corporate looks. Nobody recalls boring lighting. For cinematic drama, consider using low-key lighting with harsh shadows and high contrast, perfect for thrillers and more serious productions.
Hard light? Drama. Soft light? Flattering. Your choice depends entirely on what emotion you're after.
Fill Light Techniques: Balancing Shadows for Perfect Contrast
The fill light serves as the unsung hero of the three-light setup. Positioned opposite the key light, it quietly eliminates harsh shadows while maintaining dimension.
Without it? Facial features turn into a horror show.
Most pros set fill at 50% or less of key light intensity. A 2:1 ratio gives that clean look, while 3:1 helps to bring drama.
Lighting ratios aren't just technical—they're emotional. 2:1 says approachable; 3:1 whispers intensity.
Too strong and your subject looks flat—like they've been steamrolled.
For natural results, diffuse that fill. Hard fill is a rookie mistake. Bounce boards work wonders when equipment is limited.
Remember: fill light doesn't just illuminate. It dictates mood.
Less fill equals more intensity. More fill? Approachable and friendly.
Mastering fill light techniques is essential for visual storytelling and can be the difference between amateur and professional-looking footage.
Backlight Magic: Creating Dimension and Subject Separation

Backlight transforms flat, boring shots into dynamic, three-dimensional masterpieces.
It's science, really. By highlighting edges and separating subjects from backgrounds, backlight prevents that awful merging effect when colors match. Without it? Your subject might as well be wallpaper.
Directors love backlight for creating mood too. Romantic, intense, dramatic—it's all possible.
Just don't overdo it. Nobody needs lens flares everywhere.
Unless you're J.J. Abrams.
Achieving Professional Results on Any Budget
While many aspiring videographers believe professional lighting requires spending thousands, nothing could be further from the truth. Quality lights are now affordable for everyone. A complete three-light setup? Sometimes it can be acquired for under $100 if you're savvy.
LED panels from reputable brands cost $50-$150, offering adjustable brightness and color temperature. Combine with DIY solutions—household lamps with diffusion materials work wonders. Seriously.
Position is everything. Key light and diffuser at 45 degrees, fill light balancing shadows, backlight creating separation. Natural light through windows? Free fill light, people!
Technique trumps equipment. Always has. Even cheap lights, properly placed, create cinematic looks that expensive cameras can't fix.
Common Three-Point Lighting Mistakes to Avoid
In spite of having access to affordable lighting equipment, many videographers continue making fundamental mistakes that undermine their three-point lighting setups.
First, they botch light intensity ratios. That perfect 2:1 key-to-fill ratio? Ignored. Skin looks flat, faces lose dimension. Tragic.
Color temperature mismatches create another disaster. Mixing 5600K with 3200K sources? Enjoy those sickly skin tones and post-production nightmares.
Many also fail at subject-background separation. Without proper backlighting, subjects blend into backgrounds like camouflaged soldiers.
Poor light placement creates raccoon eyes and unflattering shadows.
And let's not forget the equipment hoarders—cramming three lights into tiny spaces when two would work fine.
Adapting Three-Point Lighting for Different Video Genres

Now that we've covered what not to do, let's look at how to do it right across different video formats.
Different genres demand different approaches. Period. Narrative films crave that dramatic 2:1 key-to-fill ratio with strong backlighting for dimension.
Commercial work? Softer please - about 1.5:1 keeps products looking pretty without appearing fake.
Documentaries need that professional three-point foundation but can flex depending on content. Happy interview? Soft fill. Exposing corruption? Harsher contrasts.
Music videos throw the rulebook out completely. Foundation remains, but go wild with colored gels and extreme ratios.
YouTube creators? Same principles apply, just scaled down for your bedroom studio setup.
Equipment Recommendations: From Beginner to Pro

Equipment makes or breaks your three-point lighting setup kit.
Beginners can start with affordable kit of lights or LED panels from Neewer or Lume Cube. They're stupidly simple to use, with that classic 2:1 key-to-fill ratio for instant cinematic looks.
Moving up? Grab modular systems like Aputure Amaran or Godox. Bi-color options. Adjustable output. More cash, more alternatives.
Pros don't mess around. High-output COB LEDs with 95+ CRI. Silent operation. Wireless control. Expensive? Yes. Worth it? Also yes.
Don't forget accessories. Light stands. Diffusion. Reflectors. Barn doors. Without these, even pricey lights look amateur.
Creative Modifications to Elevate Your Three-Point Setup

Standard three-point lighting gets boring fast. Pros know this. They break rules.
Try diffusing harsh LEDs with softboxes, umbrellas, even bedsheets. Seriously. Control spill with barn doors or black foil—dramatic shadows instantly appear.
Play with color temperature: warm Kelvin values for nostalgia, cool tones for clinical vibes. Mix them for tension.
Feeling adventurous? Ditch the standard 2:1 key-to-fill ratio. Go 4:1 for film noir moodiness or 1:1 for flat corporate looks.
Move lights to non-traditional angles. Low backlight creates rim effects. High sidelighting adds texture.
Integrate practical sources. Real lamps, window light. They're your friends.
